
Utilities
Little Snitch Part 3: Profiles
12/06/13 07:56 Filed in: Technology

Little Snitch 3 provides a profile feature that allows you to have different sets of rules for different networks. So when I am at home there are one set of rules for home. When I am at a coffee shop, there is another set of rules and Little Snitch 3 keeps track of where I am and automatically switches to the rules I have defined for that spot. It really is a great feature because it does have a set it and forget it set up.
In this screencast I cover profiles and how to set those up in Little Snitch 3. As you will see, this really is a great feature set and one you will use a lot with your mobile Macs!


Comments
Little Snitch Part 2: Rules
12/06/13 07:48 Filed in: Technology
Little Snitch also gives you suggestions of rules you might want to implement and sets up temporary rules for you to look at and decide if you want to keep or discard them. It really is a great way to keep tabs on your entire network and set up a rule set that you are comfortable with.
One thing I always have to let people know about Little Snitch is the pop ups that warn you of connections can seem overwhelming at first. With every connection asking for your permission to accept or deny you really get a good sense for how many programs are trying to connect. But with all of those connections at first you can feel like the program is getting in your way. If you stick with it and go through all the pop ups and make decisions on what you want to allow and what you want to deny, over time these will become fewer and fewer and you will have the protection and limits to access that you wanted with very little hassle. So stick with it as this really is an incredibly useful tool!
Little Snitch Part 1: Network Monitor
07/06/13 07:23 Filed in: Technology
Little Snitch provides a great solution to this problem. With it’s network filtering, it lets you see on a connection by connection basis who is trying to get into your computer from the outside and who is trying collect data from your computer from the inside. This network filtering puts you in control of each of these connections and even lets you set up rules for different locations or networks that you might connect to with your mobile Macs.
In this screencast, I give an overview of Little Snitch 3 focusing mainly on the network filter. I cover the basics of the application and all the features present in the network filter including how to get a reading of your current network and how to take snapshots in time to review later.
If you have a server, Little Snitch 3 is a great tool to help you keep tabs on your server and gives you a moment by moment opportunity to block those who may be trying to access your server.
Setting Up Pathfinder to Work with Hyperspaces
26/03/11 21:56 Filed in: Technology
One of the programs I love to use on my mac is Pathfinder. Pathfinder is a Finder replacement that has a ton of features, many that Apple’s Finder should take note of and add. Things like:
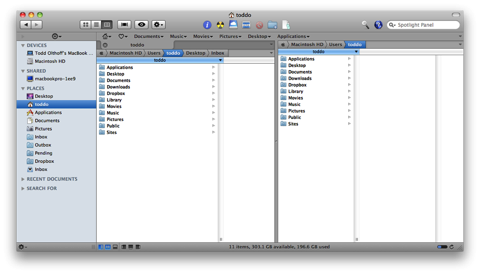
Dual Pane File Browsing
Drop Stack
Tabs & Bookmarks
File List Sorting and Filtering
Command Line Tools
Quick Look Support
Application Launcher
There are other ways to customize the look and feel of Pathfinder as well. There is:
Dual Pane View
Cover flow View
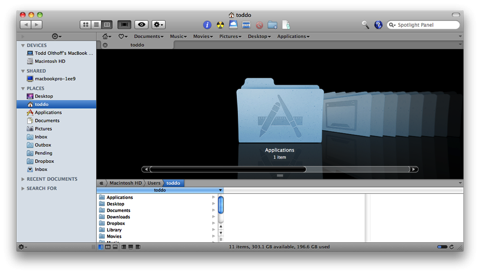
A Mix of Both Dual Pane and Coverflow

Pathfinder as Finder Replacement
Built into Pathfinder is the ability to replace most of Finder’s functions with Pathfinder. So when you open a folder it will bring up a Pathfinder window. Finder will still be running in the background because of the way it is built into the operating system but for everyday use Pathfinder will be the primary window that will be launched. To set this up, you go to the Pathfinder drop down menu and select “Show Pathfinder Desktop.”
Using Pathfinder with Hyperspaces
Now using both Pathfinder and Hyperspaces together causes some issues with which program gets priority on the desktop. To make these two programs work together do the following:
1. show the pathfinder desktop (path finder>Show Path Finder Desktop) 2. Bring the desktop forward (click on it and make sure it is the front most item). 3. Open the view option palette (view>Show view option or command J): you should see "show desktop options" at the top. 4. Click on the "set colors.." button, select Desktop in the drop down menu, and make sure that "show desktop background" is NOT checked. 5. Now you'll need to deactivate the Apple Finder's Desktop. In Path Finder, open (Pathfinder>Preferences) and switch to "General". Uncheck "hide Finder's Desktop" and relaunch the finder when asked (here I made sure "hide Finder's Desktop" was checked).
Dual Pane File Browsing
Drop Stack
Tabs & Bookmarks
File List Sorting and Filtering
Command Line Tools
Quick Look Support
Application Launcher
There are other ways to customize the look and feel of Pathfinder as well. There is:
Dual Pane View
Cover flow View
A Mix of Both Dual Pane and Coverflow
Pathfinder as Finder Replacement
Built into Pathfinder is the ability to replace most of Finder’s functions with Pathfinder. So when you open a folder it will bring up a Pathfinder window. Finder will still be running in the background because of the way it is built into the operating system but for everyday use Pathfinder will be the primary window that will be launched. To set this up, you go to the Pathfinder drop down menu and select “Show Pathfinder Desktop.”
Using Pathfinder with Hyperspaces
Now using both Pathfinder and Hyperspaces together causes some issues with which program gets priority on the desktop. To make these two programs work together do the following:
1. show the pathfinder desktop (path finder>Show Path Finder Desktop) 2. Bring the desktop forward (click on it and make sure it is the front most item). 3. Open the view option palette (view>Show view option or command J): you should see "show desktop options" at the top. 4. Click on the "set colors.." button, select Desktop in the drop down menu, and make sure that "show desktop background" is NOT checked. 5. Now you'll need to deactivate the Apple Finder's Desktop. In Path Finder, open (Pathfinder>Preferences) and switch to "General". Uncheck "hide Finder's Desktop" and relaunch the finder when asked (here I made sure "hide Finder's Desktop" was checked).
Setting Up Multiple Desktops
18/03/11 16:32 Filed in: Technology
I love using my Mac but I had the same problems most people do and that is having multiple windows open all the time and trying to find the one I want to view at the time. Sure I could use Expose but that just causes one window to come to the top and still doesn’t address the clutter. I could use spaces and spread my stuff all over the place but I found that without any organization I would just expand my clutter of windows to multiple spaces of clutter. To address how I handle the desktop and my open windows I set up a system using two tools that have made my life easier: Hyperspaces and Dock Spaces.
Hyperspaces
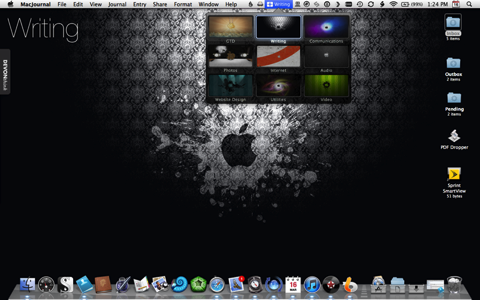
 Hyperspaces is a tool created by Tony Arnold of The Cocoabots that works with Apple’s Spaces but enhances it and allow you to do a few things you can’t do with spaces alone. First, it allows my to put a desktop label on my spaces. This has allowed me to designate certain spaces for certain things. For example I have 9 spaces I use: GTD, Writing, Communications, Photos, Internet, Audio, Website Design, Utilities, Video. Each of these spaces has a different desktop wall paper so they are easy to tell apart by background in addition to the label created on the desktop. What I like about Hyperspaces is it also creates a menubar item that tells me what space I am on and clicking it shows me all 9 spaces with their backgrounds so I can click on the space I want to go to. It is a really slick way to divide up and designate space.
Dock Spaces
 Dock Spaces is a program that allows you to customize docks for individual spaces. This allows me to have a custom dock for each space I created with Hyperspaces. What is cool about this is I am able to put all the programs I would normally use in each of my spaces on the dock and have the dock change each time I move to a different space. So I have a dock for GTD, one for Writing, one for Photos, etc. That automatically come up when I enter that space.
How it Works
When I turn on my Macbook Pro to do some work I go to each space to bring up the programs I want to use. So I will open my mail app in the Communications space, a Safari window in the Internet space, iTunes in the Audio space, etc. Then when I want to see my email I just click on the mail icon in the dock and it whisks me away to the Communications space and brings up the corresponding dock with all of my communications apps in the dock. Or, when I decide I need to look something up on the internet, I click on the Safari icon in my dock and it takes me to the internet space. This allows me to have full use of all of my spaces without having to juggle too many windows in one space. It also works seamlessly with another favorite app of mine Pathfinder. I can have the Pathfinder desktop activated and still have these multiple spaces and docks working.
To set up a dock for each space, get a copy of DockSpaces and install it. Then:
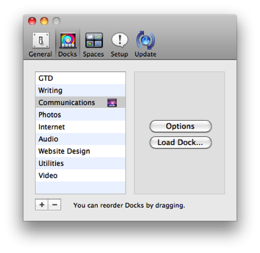 1. Click the Docks button and click the plus button for a new dock.
Now try clicking through your spaces and watch how the docks change for each space. It really works great and has made using my Macbook Pro an awesome experience. Enjoy!
Hyperspaces
Dock Spaces
How it Works
When I turn on my Macbook Pro to do some work I go to each space to bring up the programs I want to use. So I will open my mail app in the Communications space, a Safari window in the Internet space, iTunes in the Audio space, etc. Then when I want to see my email I just click on the mail icon in the dock and it whisks me away to the Communications space and brings up the corresponding dock with all of my communications apps in the dock. Or, when I decide I need to look something up on the internet, I click on the Safari icon in my dock and it takes me to the internet space. This allows me to have full use of all of my spaces without having to juggle too many windows in one space. It also works seamlessly with another favorite app of mine Pathfinder. I can have the Pathfinder desktop activated and still have these multiple spaces and docks working.
How to Set It Up
To set all of this up, get a copy of Hyperspaces and install it. Then:
- Click the preferences pane.
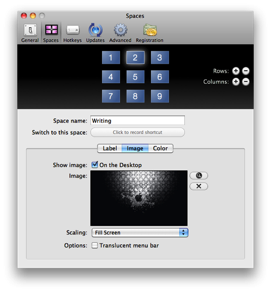
- Click on the Spaces Icon.
- Decide how many spaces you want and add the columns and rows by clicking the plus button on the right.
- Label your space in the space name field.
- Click on the Label icon and if you want the name of the space on your desktop, check the box next to the On the Desktop line.
- On the Desktop diagram at the bottom, click where on the desktop you want the label to appear.
- Next, click the image button then click the magnifying glass to upload any image you want for that desktop. I usually choose “Fill Screen” for my scaling option.
- Repeat this for each space you want to set up.
To set up a dock for each space, get a copy of DockSpaces and install it. Then:
- Label the dock to be the same name as the space you want it to go to (this will simplify knowing which dock goes with what space).
- Add or remove any applications you want on that dock for that space.
- Repeat for each space you have.
- Click the Setup button and indicate how many rows and columns you have for your spaces. This will cause Dock Spaces to associate your docks with each space.
Now try clicking through your spaces and watch how the docks change for each space. It really works great and has made using my Macbook Pro an awesome experience. Enjoy!