
Setting Up Multiple Desktops
18/03/11 16:32 Filed in: Technology
I love using my Mac but I had the same problems most people do and that is having multiple windows open all the time and trying to find the one I want to view at the time. Sure I could use Expose but that just causes one window to come to the top and still doesn’t address the clutter. I could use spaces and spread my stuff all over the place but I found that without any organization I would just expand my clutter of windows to multiple spaces of clutter. To address how I handle the desktop and my open windows I set up a system using two tools that have made my life easier: Hyperspaces and Dock Spaces.
Hyperspaces
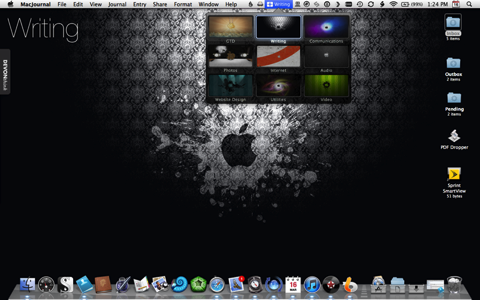
 Hyperspaces is a tool created by Tony Arnold of The Cocoabots that works with Apple’s Spaces but enhances it and allow you to do a few things you can’t do with spaces alone. First, it allows my to put a desktop label on my spaces. This has allowed me to designate certain spaces for certain things. For example I have 9 spaces I use: GTD, Writing, Communications, Photos, Internet, Audio, Website Design, Utilities, Video. Each of these spaces has a different desktop wall paper so they are easy to tell apart by background in addition to the label created on the desktop. What I like about Hyperspaces is it also creates a menubar item that tells me what space I am on and clicking it shows me all 9 spaces with their backgrounds so I can click on the space I want to go to. It is a really slick way to divide up and designate space.
Dock Spaces
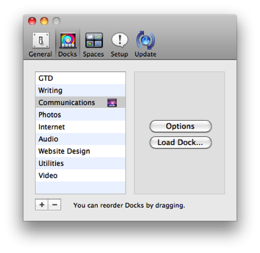
 Dock Spaces is a program that allows you to customize docks for individual spaces. This allows me to have a custom dock for each space I created with Hyperspaces. What is cool about this is I am able to put all the programs I would normally use in each of my spaces on the dock and have the dock change each time I move to a different space. So I have a dock for GTD, one for Writing, one for Photos, etc. That automatically come up when I enter that space.
How it Works
When I turn on my Macbook Pro to do some work I go to each space to bring up the programs I want to use. So I will open my mail app in the Communications space, a Safari window in the Internet space, iTunes in the Audio space, etc. Then when I want to see my email I just click on the mail icon in the dock and it whisks me away to the Communications space and brings up the corresponding dock with all of my communications apps in the dock. Or, when I decide I need to look something up on the internet, I click on the Safari icon in my dock and it takes me to the internet space. This allows me to have full use of all of my spaces without having to juggle too many windows in one space. It also works seamlessly with another favorite app of mine Pathfinder. I can have the Pathfinder desktop activated and still have these multiple spaces and docks working.
To set up a dock for each space, get a copy of DockSpaces and install it. Then:
 1. Click the Docks button and click the plus button for a new dock.
Now try clicking through your spaces and watch how the docks change for each space. It really works great and has made using my Macbook Pro an awesome experience. Enjoy!
Hyperspaces
Dock Spaces
How it Works
When I turn on my Macbook Pro to do some work I go to each space to bring up the programs I want to use. So I will open my mail app in the Communications space, a Safari window in the Internet space, iTunes in the Audio space, etc. Then when I want to see my email I just click on the mail icon in the dock and it whisks me away to the Communications space and brings up the corresponding dock with all of my communications apps in the dock. Or, when I decide I need to look something up on the internet, I click on the Safari icon in my dock and it takes me to the internet space. This allows me to have full use of all of my spaces without having to juggle too many windows in one space. It also works seamlessly with another favorite app of mine Pathfinder. I can have the Pathfinder desktop activated and still have these multiple spaces and docks working.
How to Set It Up
To set all of this up, get a copy of Hyperspaces and install it. Then:
- Click the preferences pane.
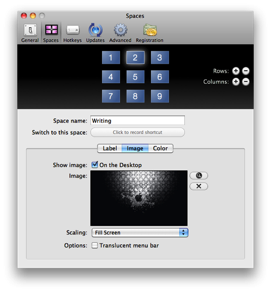
- Click on the Spaces Icon.
- Decide how many spaces you want and add the columns and rows by clicking the plus button on the right.
- Label your space in the space name field.
- Click on the Label icon and if you want the name of the space on your desktop, check the box next to the On the Desktop line.
- On the Desktop diagram at the bottom, click where on the desktop you want the label to appear.
- Next, click the image button then click the magnifying glass to upload any image you want for that desktop. I usually choose “Fill Screen” for my scaling option.
- Repeat this for each space you want to set up.
To set up a dock for each space, get a copy of DockSpaces and install it. Then:
- Label the dock to be the same name as the space you want it to go to (this will simplify knowing which dock goes with what space).
- Add or remove any applications you want on that dock for that space.
- Repeat for each space you have.
- Click the Setup button and indicate how many rows and columns you have for your spaces. This will cause Dock Spaces to associate your docks with each space.
Now try clicking through your spaces and watch how the docks change for each space. It really works great and has made using my Macbook Pro an awesome experience. Enjoy!
blog comments powered by Disqus