MacOS Sierra Server Part 15: Time Machine
As always thanks for watching! If find these tutorials helpful please like, favorite, and share them so others on the internet can find them.


Online Back Up With Backblaze
1. Hardware will fail at some point.
No matter how well you take care of your computer, hard drive and other electronics we all know that our hardware will fail at some point in the future. It is usually before we think it will happen so it surprises us, but we know it will take place. When it does fail, many times it fails beyond recovery, meaning all of you data could be lost forever.
2. A good backup strategy includes multiple copies
A good rule of thumb is, one copy is good, multiple copies is better. The more copies the more you minimize your risk of losing data.
3. Location of those back ups can be as important as how many backups you have.
You have to take into account the fact that having all your backups in one place means you have a single point of failure. If they are all at your home and get stolen or burned up or damaged by water or some other force of nature you have lost all of your data. If you have your data in multiple locations (at least one more besides your home) you still have your data even if you lose your local copy.
With this in mind, here is my strategy. First, I have a time machine back up of my data. This gives me an incremental back up just in case I accidentally delete something I want to get back. I can go back in time and get it with Time Machine. It also serves as one complete back up. Second, I use a Drobo as an external drive for those backups so if one hard drive fails my data is still safe. Next, I use SuperDuper! to make a bootable clone of my main drive so if that one fails I can boot from this backup and keep working as if nothing happened until I get an internal drive replacement. Finally, I back up to Backblaze online to handle my offsite back up. For things I really don’t want to use like family photos, etc. I back those up to another external drive that I store in a safe place.
With that in mind, I did this tutorial on Backblaze for offsite back up. Backblaze has been a great service that integrates well with the Mac and allows you to set it and forget it. It continually backs up in the background. Whatever strategy you use, be sure to keep all of these possibilities in mind (I’m sure I’ve forgotten some but at this point this is the extent of my own paranoia on the topic of backup
Feel free to leave a comment here or on my YouTube Channel!
SuperDuper!: Backing Up Multiple Drives to One
To help him see how to back up two drives to one, I put together a podcast to walk him through the process. The basic instructions on how to do this can be found in the manual for SuperDuper! found HERE. Enjoy!
New Back Up Strategy
Online Back Ups

Local Back Ups


So that is my new backup strategy. I will write an update at some point to let you know how I like it but for right now I have a better back up strategy than I have ever had. My MacPro is handled and my laptop backs up wirelessly to an Aiport drive I have hooked up to my Airport Extreme. Now I can start the new year with confidence that I at least can get to my data if I need it. Next on the list is a ultra portable drive to do a clone of my laptop drive!
Using Airdisk as a Time Machine Backup
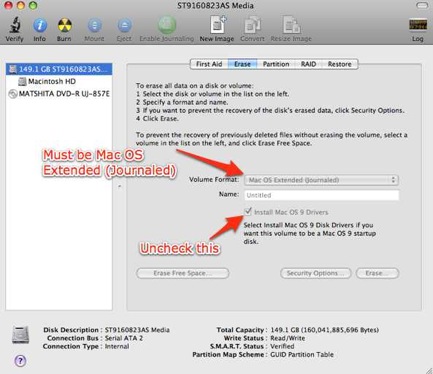
1. Reformat the Hard Drive
I took the 250GB drive I had connected to the Airport Extreme and attached it to my Macpro directly, Using Disk Utility I erased the drive and made sure it was Mac Os Extended (Journaled). If you want to set up partitions you can do so at the same time on the partition tab.
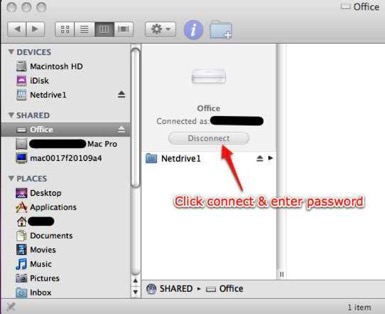
2. Plug the Drive Back Into the Airport Extreme and Mount it
Next I plugged the drive back into the Airport Extreme only, powered it up and waited for the Airport Extreme to show up in the shared section of the sidebar in the Finder. Once it showed up I clicked on it to mount it (if you have a password you will have to put in your password to get it to mount).
3. Add the Airdisk to the Devices Section of the Finder
Once the drive is mounted you have at make sure it shows up in the devices section of the Finder. Just click on the folder for your Airdisk drive and drag it to the Devices section. Once you do that it will show the drive with a new icon in the devices section. This will allow Time Machine to see the drive.

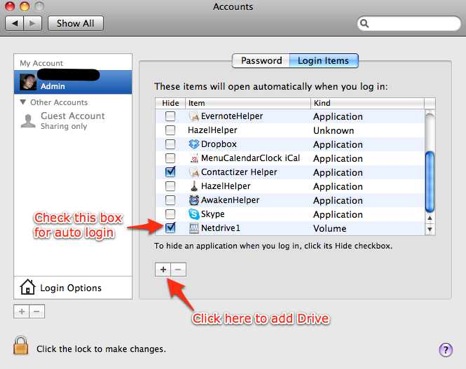
4. Make sure the Airdisk Shows up as a Device Every Time You Login
To make sure the airdisk always shows up when you login, go to System Preferences and click on Accounts. Once in Accounts (you may need to push the lock button in the bottom left corner and give your system login to unlock your preferences) click the tab that says login items. On the list that comes up, click the “+” sign in the bottom left of that window to add an item. Browse to the Airdisk you just added to devices and click add. You will now see it on the list of login items. Make sure the box next to it is checked so that you will automatically mount the Airdisk on login.
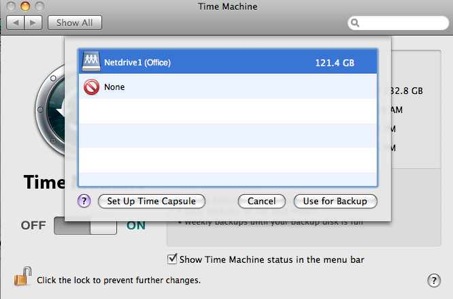
5. Set the Airdisk as your Time Machine Backup
Now go to System Preferences and click on the Time Machine Icon. On the Time Machine screen click Change Disk. You should now see your Airdisk in the list of available Time Machine Volumes. Select the Airdisk. Now Turn Time Machine on if you haven’t already and it will begin to prepare the disk for back up! Remember this will take a long time as you are doing the initial back up of your entire hard drive over the air. It took me 14 hours to back up 116GB of data. You may want to set your Energy Saver settings to not let your computer sleep while the backup is going on (System Preferences-Energy Saver-Set the time to sleep to never).